Creation, Configuration, and Management of Identities
Creation, Configuration, and Management of Users
User accounts contain all the information needed to authenticate users during the sign-in process. Once authenticated, Microsoft Entra ID issues access tokens to authorize users and determine which resources they can access and what actions they can perform on those resources.
Viewing Users
To view Microsoft Entra users, select the Users entry under Identity, then open the All Users view. Note the User Type column to see members and guests, as shown in the following image.
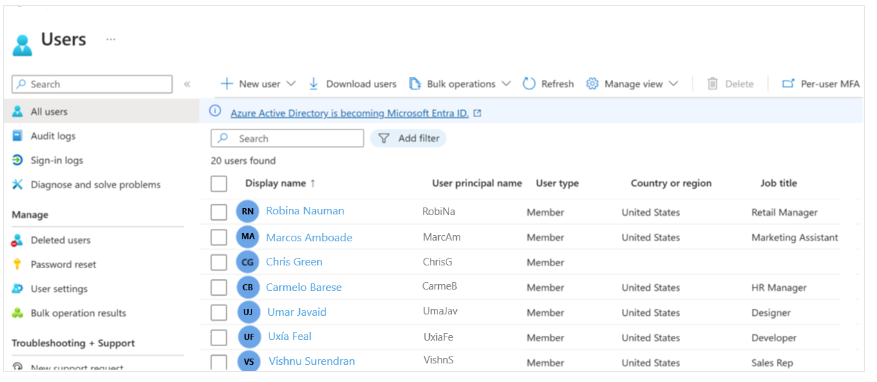
Typically, Microsoft Entra ID defines users in three ways:
- Cloud identities – These users exist only in Microsoft Entra ID. Examples include administrator and regular user accounts.
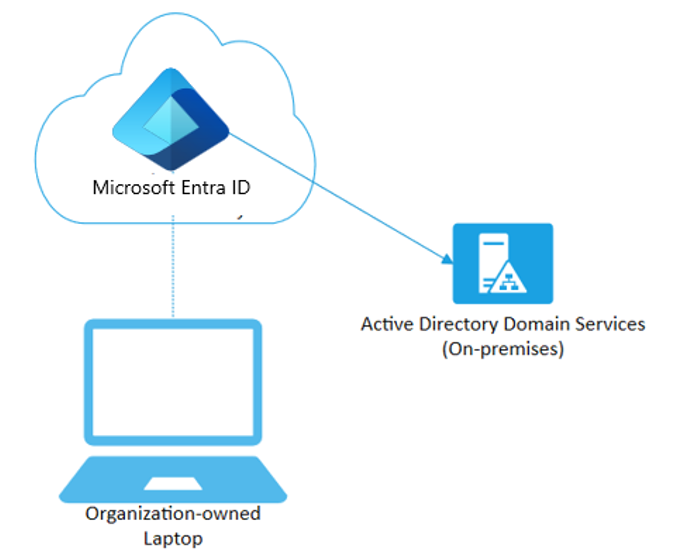
Their source is Microsoft Entra ID or an external Microsoft Entra directory if the user is defined in another Microsoft Entra tenant but needs access to resources controlled by this directory. - Synchronized identities – These users exist in the on-premises Active Directory. Synchronization activities performed through Microsoft Entra Connect bring these users to Azure. Their source is Windows Server AD.
- Guest users – These users exist outside Azure. Examples include accounts from other cloud providers and Microsoft accounts like Xbox LIVE accounts. Their source is Invited User. This account type is useful when external vendors or contractors require access to Azure resources.
Assigning Licenses to Users
To create users in Microsoft Entra, you must have a User Administrator account.
Creating a New User in Microsoft Entra ID
- Open the Identity menu in the Microsoft Entra admin center.
- In the left navigation, select Users, then All Users.
- On the Users page, in the menu, select + New user and then Create new user.
- Create the user using the following information:
| Configuration | Value |
|---|---|
| User principal name | ChrisG |
| Name | Chris Green |
| First Name | Chris |
| Last Name | Green |
| Password | Create a unique password |
- After completion, verify that the account Chris Green appears in the All Users list.
Creating a Security Group in Microsoft Entra ID
- Open the Microsoft Entra admin center.
- In the left navigation, under Identity, select Groups, then All groups.
- On the Groups page, in the menu, select New group.
- Create the group with the following information:
| Configuration | Value |
|---|---|
| Group type | Security |
| Group Name | Marketing |
| Membership type | Assigned |
| Owners | Administrator |
| Members | Chris Green |
- After completion, verify that the group named Marketing appears in the All groups list.
Assigning Licenses to a Group
- In the All groups list, select the Marketing group.
- In the Marketing window, under Manage, select Licenses.
- Note that no licenses have been assigned to this group yet.
- Open a new browser tab.
- Go to the Microsoft 365 admin center at http://admin.microsoft.com.
- Select Billing from the left menu.
- Select Licenses.
- From the available licenses list, choose one.
- Then select Groups near the top of the page.
- On the Groups page, select + Assign license.
- Search for and select the Marketing group created earlier.
- Click the Assign button at the bottom of the dialog.
- You will receive a confirmation that the license has been successfully assigned.
Recovering or Deleting Recently Deleted Users in Microsoft Entra ID
After you delete a user, the account remains in a suspended state for 30 days. During this 30-day period, the user account and all its properties can be recovered. After the period ends, permanent deletion begins automatically.
Neither you nor Microsoft Support can recover users who have been permanently deleted.
- You must have one of the following roles to recover or permanently delete users:
- Global administrator
- Partner Tier-1 Support
- Partner Tier-2 Support
- User administrator
Restoring or Deleting Users
This exercise assumes you have a basic Microsoft Entra tenant with at least User Administrator rights. You can get a free trial subscription at Try Azure for Free.
Deleting a User from Microsoft Entra ID
- Open the Microsoft Entra admin center.
- In the left navigation, under Identity, select Users.
- In the Users list, check the box next to the user to delete, e.g., Chris Green.
Selecting users directly from the list lets you manage multiple users at once.
If you click the user name to open the user detail page, you will manage only that single user.
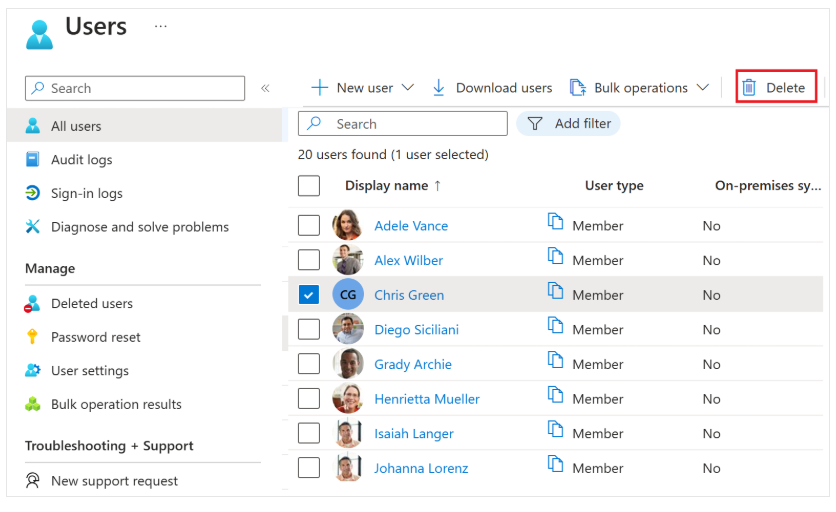
- After selecting the user account, in the menu, select Delete user.
- Review the dialog box, then select OK.
Restoring Deleted Users
- You can view all users deleted within the last 30 days. These users are still recoverable.
- On the Users page, in the left navigation, select Deleted users.
- Review the deleted users list and select the user you previously deleted.
By default, deleted user accounts are permanently removed from Microsoft Entra ID after 30 days.
- In the menu, select Restore user.
- Review the dialog box, then select OK.
- In the left navigation, select All users.
- Verify that the user has been successfully restored.
Creation, Configuration, and Management of Groups
A Microsoft Entra group helps organize users, making it easier to manage access permissions. By using groups, resource owners (or Microsoft Entra directory owners) can assign a set of access permissions to all group members at once, rather than granting access rights individually. Groups enable defining security boundaries and then adding or removing specific users to grant or revoke access with minimal effort.
Microsoft Entra ID supports membership rules—such as by department or job role—to define group membership.
Types of Groups in Microsoft Entra ID
Microsoft Entra ID allows you to define two types of groups:
1. Security groups – The most common type used to manage member and device access to shared resources. For example, you can create security groups for specific security policies. This way, you assign a set of permissions to all members at once rather than individually. This option requires a Microsoft Entra administrator.
2. Microsoft 365 groups – These groups enable collaboration by giving members access to shared mailboxes, calendars, files, SharePoint sites, and more. They also allow access to people outside your organization. This option is available for regular users and admins.
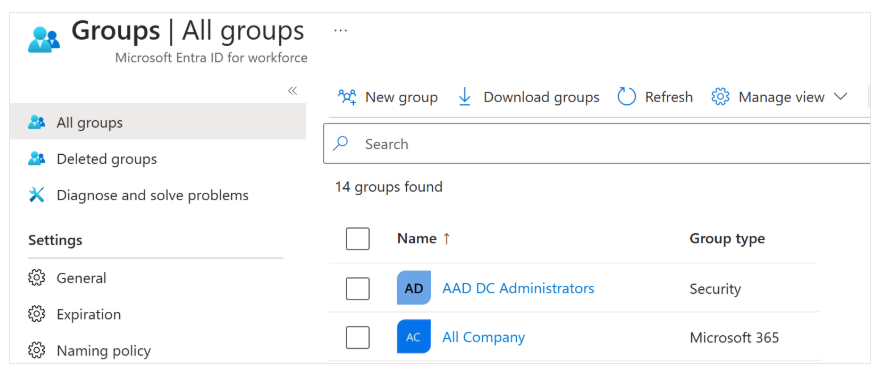
Viewing Available Groups
You can view all groups via the Groups item under Identity in the Microsoft Entra admin center. A new Microsoft Entra ID deployment usually starts with no groups defined.
Group Membership Types
The second characteristic to know about a group is Membership Type, which determines how members are added. There are two types:
- Assigned – Members are added and managed manually.
- Dynamic – Members are added based on rules, forming a Dynamic Group. Dynamic groups are either security or Microsoft 365 groups whose membership is controlled by rules.
Dynamic Groups
The last group type is dynamic groups, where membership is determined by a formula each time the group is evaluated. A dynamic group includes all recipients in Active Directory whose attribute values match the specified filter. If a recipient’s properties change to meet the filter, they automatically become members and start receiving messages sent to the group. Well-defined and consistent account provisioning reduces potential issues.

These dynamic groups consist of all valid Microsoft Entra ID members.
Adding Groups in Microsoft Entra ID
Creating a Microsoft 365 Group in Microsoft Entra ID
- Open the Identity page in the Microsoft Entra admin center.
- In the left navigation, select Groups.
- In the Groups section, select New group from the menu.
- Create the group using the following information:

- After completion, verify that the group named Northwest Sales appears in the All groups list.
- You might need to refresh the All groups list several times before the new group appears.
Device Registration Configuration and Management
To protect assets, IT staff must first manage device identities. They can then build management using tools like Microsoft Intune to ensure security standards and compliance are met. Microsoft Entra ID enables single sign-on (SSO) to devices, applications, and services from anywhere.
- Users can access organizational assets they need.
- IT staff have the control required to secure the organization.
The goal of devices registered in Microsoft Entra is to support bring-your-own-device (BYOD) or mobile device scenarios. In these cases, users can access resources controlled by Microsoft Entra ID using their personal devices.
| Microsoft Entra Registered | Description |
|---|---|
| Definition | Registered to Microsoft Entra ID without requiring an organizational account to sign in to the device |
| Primary Audience | Suitable for BYOD scenarios and mobile devices |
| Device Ownership | User or Organization |
| Operating System | Windows 10, Windows 11, iOS, Android, and macOS |
| Device Sign-in Options | User local credentials, Password, Windows Hello, PIN, Biometric |
| Device Management | Mobile Device Management (e.g., Microsoft Intune) |
| Key Features | SSO to cloud resources, Conditional Access |
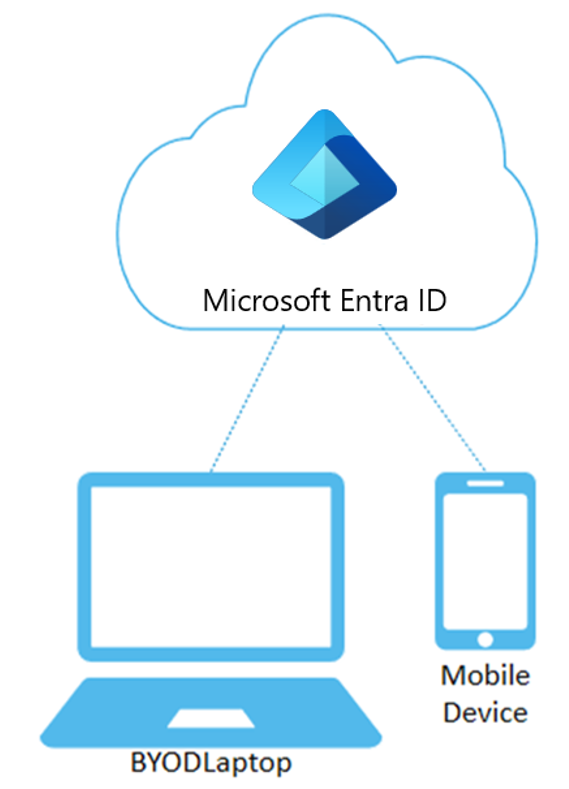
These devices sign in using local accounts like Microsoft accounts on Windows 10, with Microsoft Entra accounts linked for organizational resource access.
Administrators can secure and control these devices using Mobile Device Management (MDM) such as Microsoft Intune, e.g., enforcing storage encryption, password complexity, and keeping software updated.
Microsoft Entra ID registration can happen when first accessing a work app or manually via the Settings menu on Windows 10.
Scenarios for Registered Devices
- User A wants to access organization email and HR services from their home PC. They register their personal PC with Microsoft Entra ID, and Intune policies apply to meet access requirements.
- User B tries to access organization email from a rooted Android device. Intune policies block rooted devices, so access is denied.
Devices Joined to Microsoft Entra
Microsoft Entra Join is aimed at organizations adopting cloud-first or cloud-only strategies. Organizations can access cloud and on-premises apps and resources.
| Microsoft Entra Joined | Description |
|---|---|
| Definition | Only joined to Microsoft Entra ID and requires an organizational account to sign in to the device |
| Primary Audience | Suitable for cloud-only and hybrid organizations |
| Device Ownership | Organization |
| Operating System | All Windows 10 & 11 (except Windows Home) |
| Device Management | MDM such as Microsoft Intune |
| Key Features | SSO to cloud and on-premises resources, Conditional Access, Windows Hello PIN Reset, Self-service Password Reset |
Devices joined to Microsoft Entra sign in with organizational Microsoft Entra accounts. Access to organizational resources can be further restricted based on the Microsoft Entra account and Conditional Access policies applied to device identities.
Administrators can secure and control Microsoft Entra joined devices using Mobile Device Management (MDM) like Microsoft Intune or, in co-management scenarios, Microsoft Endpoint Configuration Manager.
These tools enable applying organizationally required configurations such as:
- Storage encryption,
- Password complexity,
- Software installation,
- Software updates.
Administrators can also deploy organizational apps to Microsoft Entra joined devices using Configuration Manager. Microsoft Entra Join can be done via self-service options like Out of Box Experience (OOBE), bulk enrollment, or Windows Autopilot.
Microsoft Entra joined devices retain single sign-on (SSO) access to on-premises resources when on the organization's network. These devices can authenticate to on-premises servers for file sharing, printing, and other applications.
Scenarios for Joined Devices
Although Microsoft Entra Join is mainly for organizations without on-premises Windows Server Active Directory infrastructure, you can use it if:
- You want to move to cloud-based infrastructure using Microsoft Entra ID and MDM like Intune.
- You cannot use on-premises domain join, e.g., managing mobile devices like tablets and phones.
- Your users primarily access Microsoft 365 or SaaS apps integrated with Microsoft Entra ID.
- You want to manage users in Microsoft Entra ID instead of Active Directory. This applies for seasonal workers, contractors, or students.
- You want to enable branch office workers with limited on-premises infrastructure to join devices.
You can configure Microsoft Entra joined devices for all Windows 10 devices except Windows 10 Home.
The goal of Microsoft Entra Join devices is to simplify:
- Windows deployment for organization-owned devices,
- Access to organization apps and resources from any Windows device,
- Cloud-based management for organization-owned devices,
- Users signing in to devices using Microsoft Entra ID or synced Active Directory work or school accounts.
Hybrid Microsoft Entra Joined Devices
For over a decade, many organizations have used domain join to their on-premises Active Directory to enable:
- IT departments to manage organization-owned devices from a central location,
- Users to sign in with their Active Directory work or school accounts.
Typically, organizations with on-premises infrastructure rely on imaging for device setup and often use Configuration Manager or Group Policy (GP) for management.
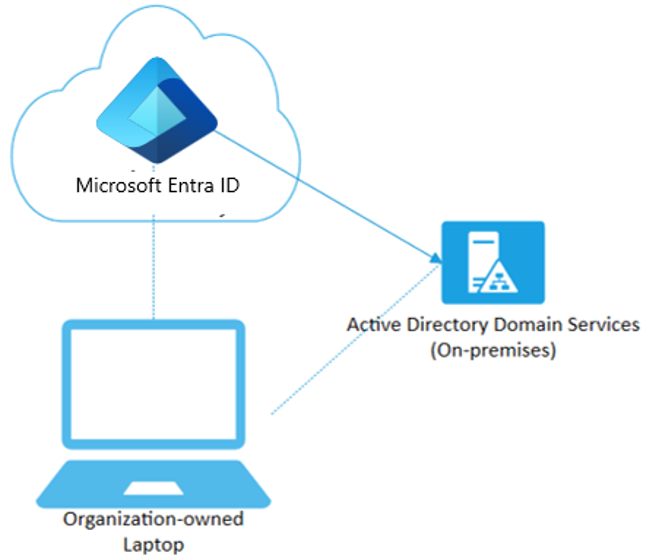
If your environment has on-premises AD infrastructure and you want benefits from Microsoft Entra ID, you can implement hybrid Microsoft Entra Join devices. These devices are joined to your on-premises Active Directory and registered with your Microsoft Entra directory.
| Description | Detail |
|---|---|
| Definition | Joined to on-premises AD and Microsoft Entra ID, requiring an organizational account to sign in |
| Primary Audience | Suitable for hybrid organizations with existing on-premises AD infrastructure |
| Device Ownership | Organization |
| Operating System | Windows 11, 10, 8.1, and 7, as well as Windows Server 2008/R2, 2012/R2, 2016, and 2019 |
| Sign-in Options | Password or Windows Hello for Business |
| Device Management | Group Policy, standalone Configuration Manager, or co-management with Microsoft Intune |
| Key Capabilities | SSO to cloud and on-premises resources, Conditional Access, Self-service Password Reset, Windows Hello PIN reset |
Scenarios for Hybrid Joined Devices
Use hybrid Microsoft Entra joined devices if:
- You have Win32 apps deployed to these devices that depend on Active Directory machine authentication.
- You want to continue using Group Policy for device configuration.
- You want to continue using existing imaging solutions for device deployment and configuration.
- You need to support Windows 7 and 8.1 devices, in addition to Windows 10.
Device Writeback
In a cloud-based Microsoft Entra ID configuration, devices are registered only in Microsoft Entra ID. Your on-premises AD does not have visibility of these devices. This makes cloud conditional access easy to configure and maintain. However, for hybrid scenarios with Microsoft Entra Connect, how do you perform on-premises conditional access if the device exists only in Microsoft Entra ID? Device writeback helps track Microsoft Entra ID-registered devices in AD by creating a copy of the device object in the "Registered Devices" container.
Scenario: You have apps that should grant access only if users come from registered devices.
- Cloud: You can write Conditional Access policies for apps integrated with Microsoft Entra based on whether the device is joined to Microsoft Entra ID or not.
- On-premises: This is impossible without device writeback. If apps integrate with ADFS (2012 or later), you can write claim rules to check device status and grant access only if the "is managed" claim exists. To issue this claim, ADFS checks the device object in the "Registered Devices" container and issues claims accordingly.
Windows Hello For Business (WHFB) requires device writeback to function in Hybrid and Federated scenarios.
License Management
Microsoft 365, EMS, Dynamics 365, and other Microsoft cloud services require licenses for each user. Previously, licenses could only be assigned per user; now group-based license assignment is available.
Benefits of Group-Based License Assignment
- Simplifies license management at scale.
- Automatically assigns or removes licenses when users join or leave the group.
- Reduces the need for complex PowerShell scripts for users.
License Requirements
You must have one of the following:
- Microsoft Entra ID Premium P1 (or higher).
- Office 365 Enterprise E3, A3, GCC G3, E3 for GCCH/DOD (or higher).
- Sufficient number of licenses for all group members.
Key Features
| Feature | Description |
|---|---|
| Assignment to Security Group | Groups can come from on-premises (synced via Entra Connect) or created directly in the cloud (Entra ID). |
| Disable Services | Admins can disable specific services within a product during license assignment. |
| Service Support | Applies to Microsoft 365, EMS, and Dynamics 365. |
| Portal | Currently only available via Azure Portal (coming soon to Microsoft Entra Admin Center). |
| Automatic Management | Licenses are automatically updated when group membership changes. |
| License Combination | Users can receive licenses from multiple groups or direct assignments, but are counted only once. |
| Assignment Failure | If assignment fails (due to quota limits or service conflicts), admins can view affected users for troubleshooting. |
| Usage Location | A location must be set to ensure region-specific licensing; it can inherit from the directory if not specified. |
Identifying and Resolving Group License Assignment Issues in Microsoft Entra ID
| License Issue | Description | Solution | PowerShell Error Name |
|---|---|---|---|
| Insufficient Licenses | Not enough licenses for the required product. | Purchase additional licenses or free up unused licenses. | CountViolation |
| Service Plan Conflict | Two service plans from different products cannot be used together (e.g., SharePoint Plan 1 vs Plan 2). | Disable one service plan or remove one license. | MutuallyExclusiveViolation |
| Product Depends on Another License | A service requires another service to function (e.g., Workplace Analytics requires Exchange Online). | Ensure prerequisite services remain active before removing others. | DependencyViolation |
| Usage Location Not Allowed | User's location does not support certain Microsoft services. | Change the user's usage location to a supported location or remove from the group. | ProhibitedInUsageLocationViolation |
| Duplicate Proxy Address | User has a proxy address duplicated by another user. | Fix the duplicate proxy address, then reprocess the user. | (Not specific, related to proxy address error) |
| Changes to Mail/ProxyAddresses Attributes | License changes trigger modifications to Mail or ProxyAddresses attributes. | Allowed, no special action needed. | (Not specific) |
| LicenseAssignmentAttributeConcurrencyException | Concurrent duplicate license assignment to a user. | No action needed; Microsoft Entra will automatically retry. | LicenseAssignmentAttributeConcurrencyException |
- Reprocess Group: If errors persist after fixes, click the Reprocess button on the group’s Licenses page to update status.
- Reprocess User: After fixing errors on a specific user (e.g., proxy address), click Reprocess on the user’s page.
- License Migration: Avoid removing individual licenses until group-based licenses are active to prevent access loss.
Changing License Assignments on a User
- Open the Identity - Users page in the Microsoft Entra Admin Center.
- In the left navigation, select Users.
- In the Users pane, choose New user.
- Create the user using the following information:
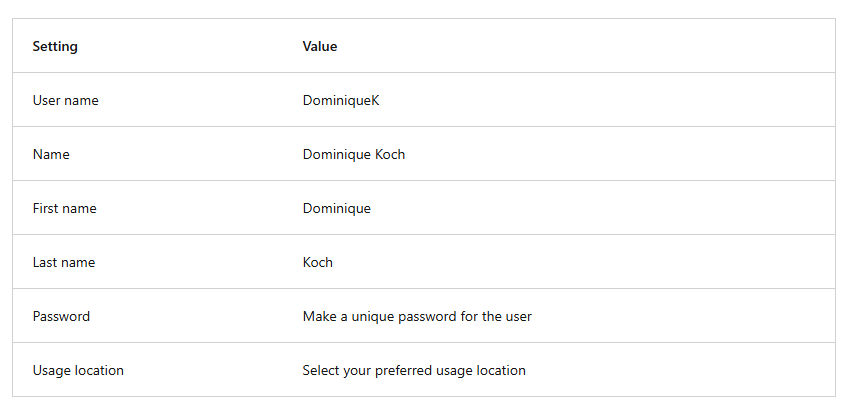
- Once done, open Microsoft Entra ID and click Users to verify that Dominique Koch’s account appears in the user list.
Updating User License Assignments
- Open the Microsoft Entra Admin Center.
- In the left navigation, under Identity, select Users.
- On the Users screen, select Dominique Koch.
- In the left navigation, select Licenses.
- In the Update license assignments pane, check one or more license boxes.
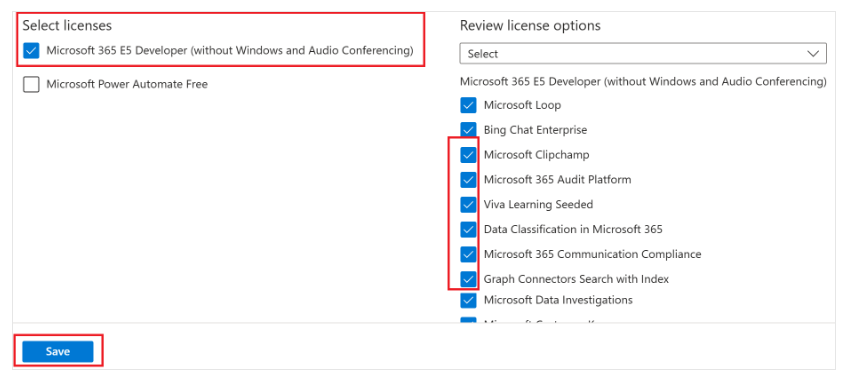
- Click Save.
Creating Custom Attributes for Security
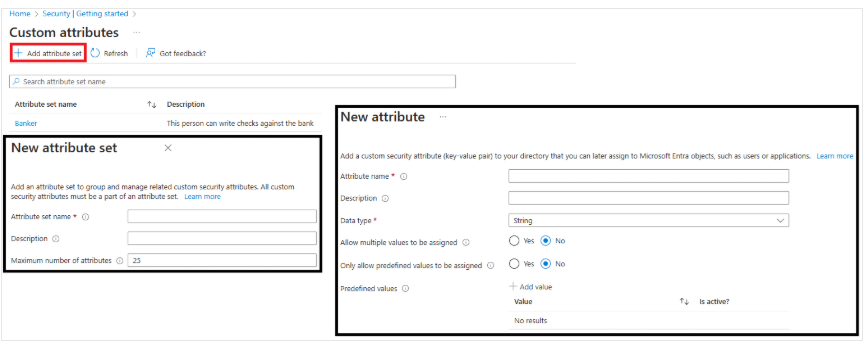
What Are Custom Security Attributes?
Custom security attributes in Microsoft Entra ID are business-specific attributes (key-value pairs) that you can define and assign to Microsoft Entra objects.
These attributes can be used to store information, categorize objects, or enforce more granular access controls on certain Azure resources.
Why Use Custom Security Attributes?
- Extend user profiles, e.g., add Employee Hire Date and Hourly Wage for all employees.
- Ensure only administrators can view Hourly Wage attributes on employee profiles.
- Categorize hundreds or thousands of applications to create easily filterable inventories for audit purposes.
- Grant user access to Azure Storage blobs related to a project.
What Can You Do with Custom Security Attributes?
- Define business-specific information (attributes) for your tenant.
- Add sets of custom security attributes to users, applications, Microsoft Entra resources, or Azure resources.
- Manage Microsoft Entra objects using custom security attributes via queries and filters.
- Provide attribute governance to control who can gain access based on attributes.
Features of Custom Security Attributes
| Feature | Description |
|---|---|
| Applies across all tenants | Attributes can be used across all tenants. |
| Includes description | Each attribute can have a description. |
| Supports various data types | Boolean, integer, string. |
| Supports single or multiple values | Can have one or several values for a single attribute. |
| Supports free-form values or predefined values | Can use free-form input or choose from a predefined list. |
| Can be set for users synchronized from local Active Directory | Support for hybrid users (local and cloud). |
Options for Automatic User Creation
SCIM (System for Cross-Domain Identity Management) Components
-
HCM System (Human Capital Management):
Applications and technologies that enable human capital management processes and automate HR lifecycle activities. -
Microsoft Entra Provisioning Service:
Uses SCIM 2.0 protocol for automatic provisioning. Connects to SCIM endpoints for applications and uses SCIM user object schemas and REST APIs to automate user and group provisioning and de-provisioning. -
Microsoft Entra ID:
User repository used to manage identity lifecycle and access rights. -
Target System:
Applications or systems with SCIM endpoints that work with Microsoft Entra provisioning to enable automatic user and group provisioning.

Why Use SCIM?
SCIM is an open standard protocol that automates identity information exchange between identity domains and IT systems. SCIM ensures employees added to the Human Capital Management system automatically have accounts created in Microsoft Entra ID or Windows Server Active Directory. User attributes and profiles are synchronized between systems, updating or removing users based on their status or role changes.
Key Benefit of Using SCIM
Keeps your identity systems always up to date. If a user can be automatically removed from Microsoft Entra ID immediately after being deleted from your HR system, the risk of potential security breaches is greatly reduced.