Azure Blob Storage Configuration
Implementing Azure Blob Storage
Azure Blob Storage is a service that stores unstructured data in the cloud as objects or blobs. Blob stands for Binary Large Object. Blob Storage is also known as object storage or container-based storage.
Key Concepts of Azure Blob Storage
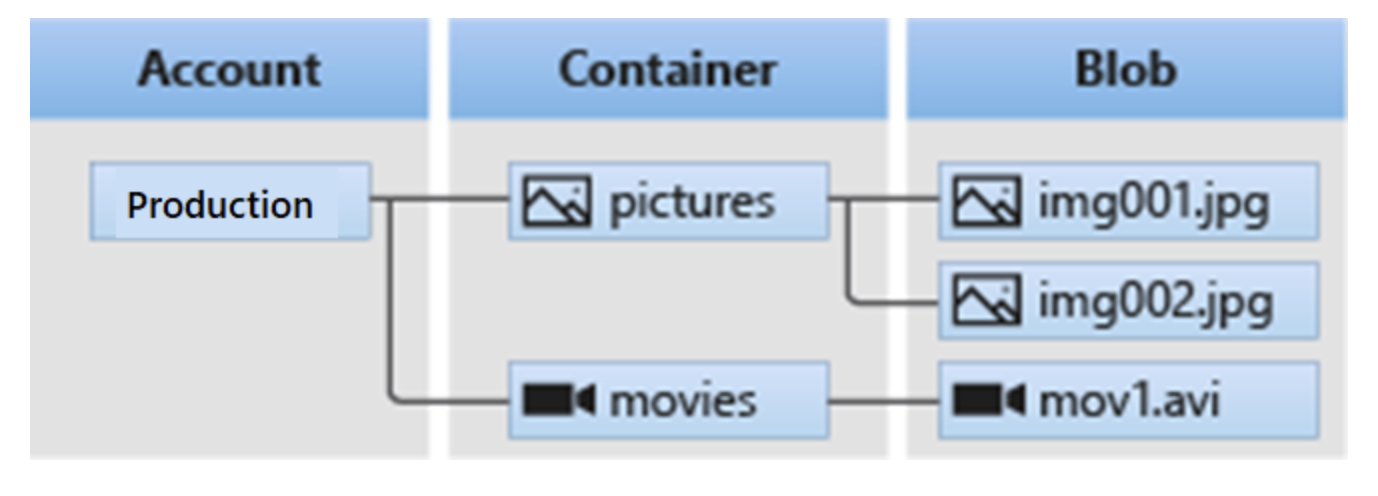
Blob Storage can store a variety of text or binary data types. Examples include text documents, images, video files, and application installers. Blob Storage uses three resources to store and manage your data:
- Azure storage account
- Containers within the storage account
- Blobs within the container
To implement Blob Storage, you need to configure the following:
- Blob container options
- Blob types and upload methods
- Blob Storage access tiers
- Blob lifecycle
- Blob object replication options
The diagram below shows the relationship between Blob Storage resources:
Considerations When Implementing Azure Blob Storage
Consider the following scenarios and think about your data needs:
- Upload via browser: Use Blob Storage to serve images or documents directly to a browser.
- Distributed access: Blob Storage can store files for distributed access.
- Data streaming: Use Blob Storage to stream video and audio.
- Archiving and recovery: Blob Storage can store backup and disaster recovery (BCDR) data, as well as archives.
- App access: Store data in Blob Storage for analysis by on-premises services or those hosted in the Azure cloud.
Creating a Blob Container
Azure Blob Storage uses container resources to group a set of blobs. A blob cannot exist independently in Blob Storage. Every blob must reside within a container.
Key Concepts of Containers and Blobs
Let’s review some configuration characteristics of containers and blobs:
- All blobs must reside in a container.
- A single container can store an unlimited number of blobs.
- One Azure storage account can have unlimited containers.
- You can create containers via the Azure portal.
- You can upload blobs into a container.
Configuring a Container
In the Azure portal, you'll encounter two key settings when creating a container in a storage account:
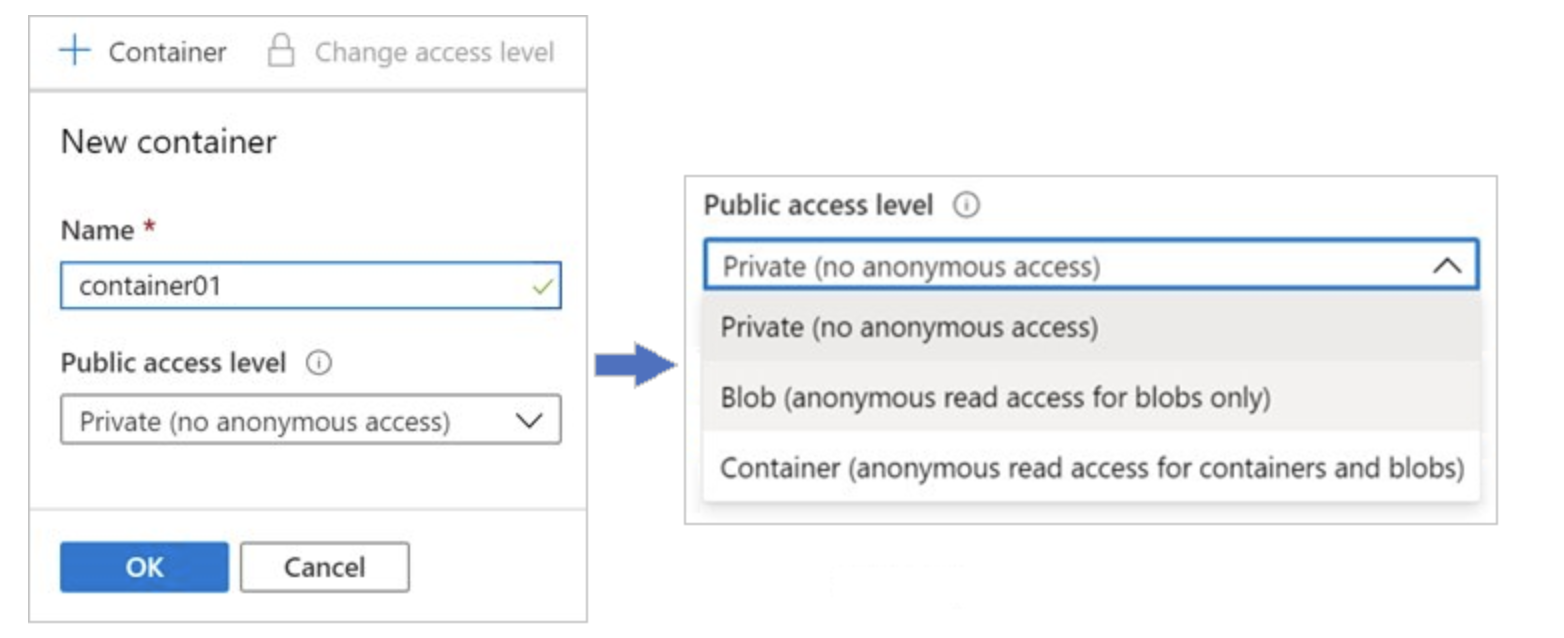
Name: Enter a unique name for your container within the Azure storage account.
- Name must contain only lowercase letters, numbers, and hyphens.
- Name must start with a letter or number.
- Minimum name length is 3 characters.
- Maximum name length is 63 characters.
Public access level: This setting determines whether the container and its blobs can be accessed publicly. By default, container data is private and only visible to the account owner. There are three access levels:
- Private: (Default) Disallows anonymous access to the container and blobs.
- Blob: Allows anonymous public read access to blobs only.
- Container: Allows anonymous public read and list access to the entire container and its blobs.
You can also create a blob container using PowerShell with the New-AzStorageContainer command.
Blob Access Tiers
Hot Tier
- Optimized for data that is accessed or modified frequently.
- Ideal for actively used data.
- High storage cost, but low access cost.
Cool Tier
- Optimized for infrequently accessed data stored for at least 30 days.
- Suitable for short-term backups or aging data that is still needed.
- Lower storage cost than Hot, but higher access cost.
Cold Tier
- For rarely accessed data, stored for at least 90 days.
- Cheaper than Cool in terms of storage, but higher access cost.
Archive Tier
- For archive data that is rarely accessed and can tolerate several hours of latency.
- Data must be stored for at least 180 days.
- Lowest storage cost, but highest access cost.
Access Tier Comparison
Access tiers in Azure Blob Storage offer different features and levels of support to help optimize storage costs. When comparing these options, consider which is most suitable for your needs.
| Comparison | Hot Access Tier | Cool Access Tier | Cold Access Tier | Archive Access Tier |
|---|---|---|---|---|
| Availability | 99.9% | 99% | 99% | 99% |
| Availability (RA-GRS reads) | 99.99% | 99.9% | 99.9% | 99.9% |
| Latency (time to first byte) | milliseconds | milliseconds | milliseconds | hours |
| Minimum retention duration | None | 30 days | 90 days | 180 days |
Adding Blob Lifecycle Management Rules
Azure Blob Storage supports lifecycle management for data sets. Azure provides rich rule-based policies for GPv2 and Blob Storage accounts. You can use lifecycle policy rules to:
- Transition data to the appropriate access tier, and
- Set expiration to end the lifecycle of data sets.
Key Concepts of Lifecycle Management
You can use lifecycle management policy rules in Azure Blob Storage to:
- Move blobs to a cooler tier (Hot to Cool, Hot to Archive, or Cool to Archive) to optimize performance and cost.
- Delete blobs at the end of their lifecycle.
- Define rule-based conditions that run once per day at the storage account level.
- Apply rule-based conditions to specific containers or subsets of blobs.
Business Scenario
Consider a scenario where data is accessed frequently in the early stage, but only occasionally after two weeks. After a month, it is rarely accessed. In this case:
- The Hot tier is suitable initially.
- The Cool tier fits once access becomes infrequent.
- The Archive tier is best after the data is over a month old.
To achieve this automatic transition, you can use lifecycle management policy rules to move older data to cooler tiers.
Configuring Lifecycle Management Policy Rules
In the Azure portal, you can create lifecycle management policy rules for your Azure storage account by specifying a few settings. Each rule defines an If - Then condition to transition or delete data based on your criteria.
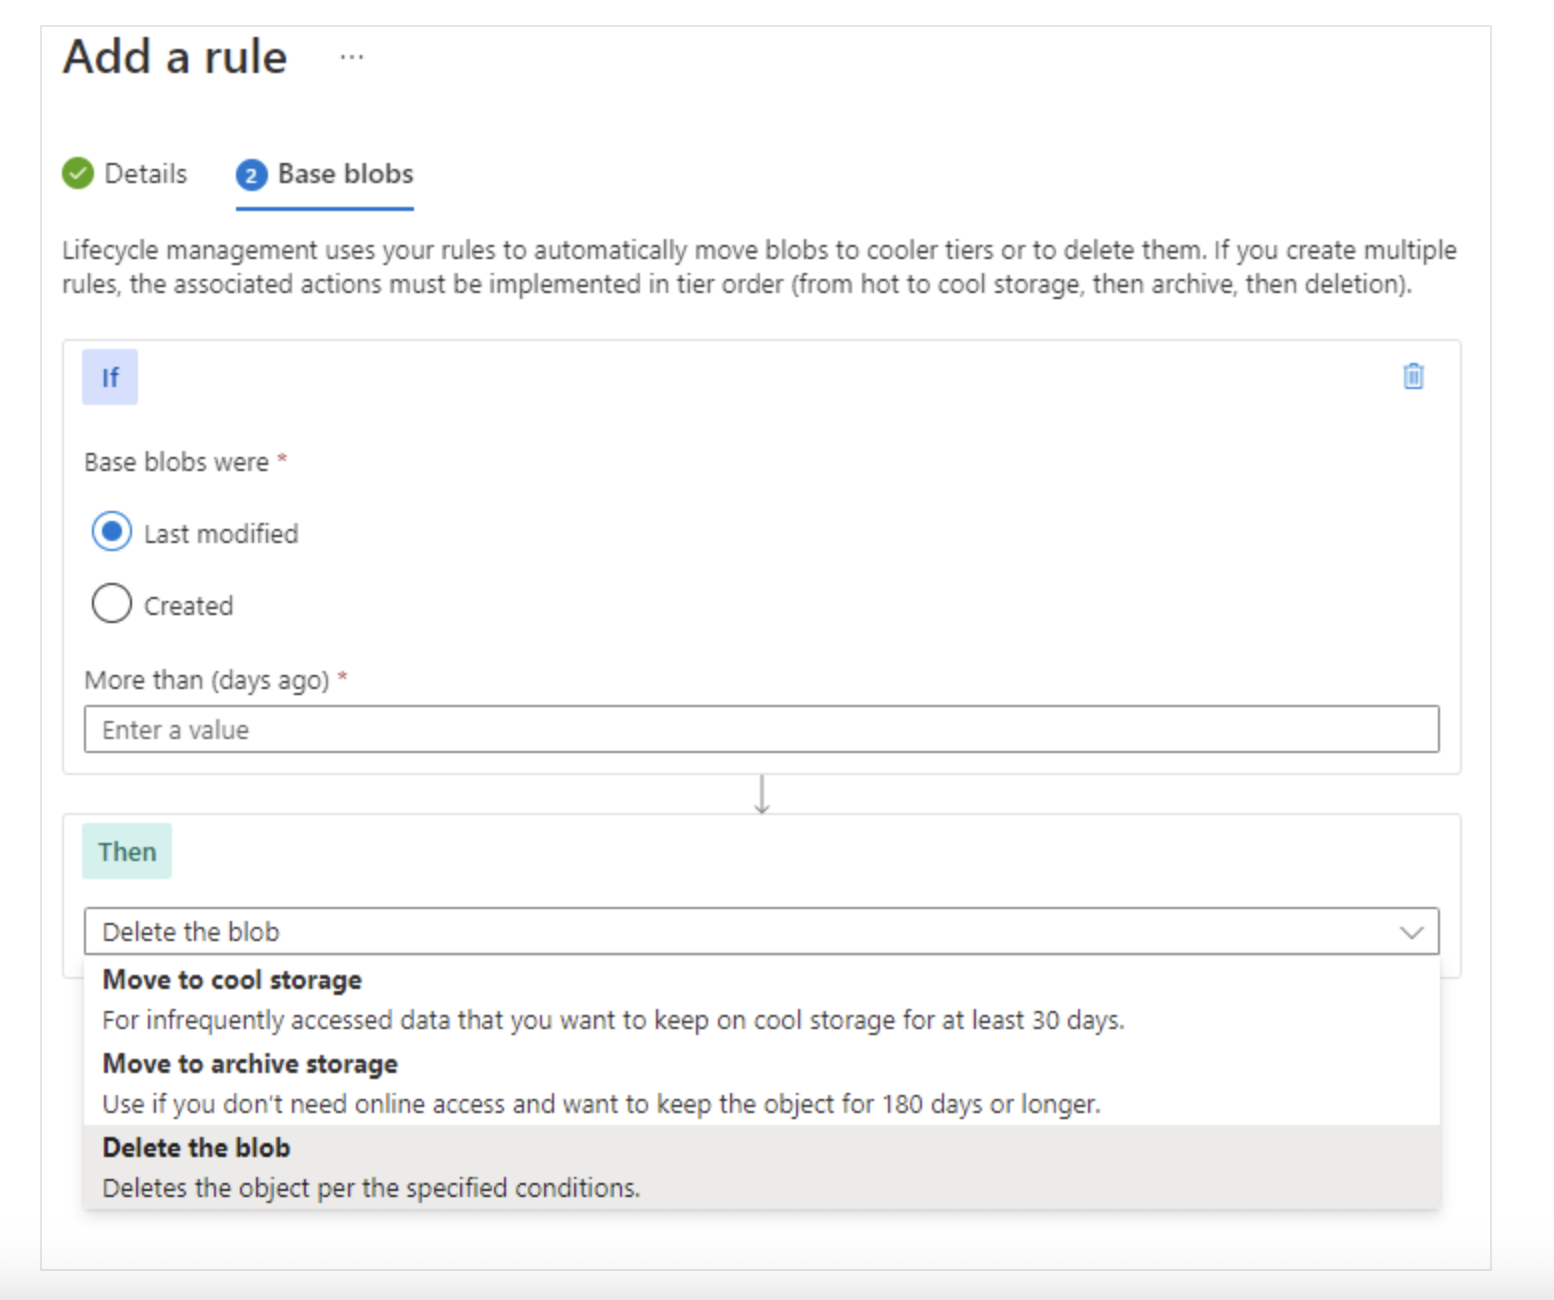
-
If: This clause defines the evaluation condition for the policy rule. When the If clause is true, the Then clause is executed. Use the If clause to define the time period applied to blob data. Lifecycle management checks whether data has been accessed or modified based on the specified time.
- Greater than (days ago): Number of days used in the evaluation condition.
-
Then: This clause defines the action taken when the If condition is met. Use the Then clause to define the transition actions for blob data.
- Move to Cool storage: Moves blob data to the Cool tier.
- Move to Cold storage: Moves blob data to the Cold tier.
- Move to Archive storage: Moves blob data to the Archive tier.
- Delete blob: Deletes the blob data.
By designing rules that adjust storage tiers based on data age, you can create the most cost-effective storage solution for your needs.
Understanding Blob Object Replication
Object replication copies blobs in a container asynchronously according to a configured policy. During replication, the following are copied from the source to the destination container:
- Blob content
- Blob metadata and properties
- All data versions associated with the blob

Key Concepts of Blob Object Replication
Things to consider when planning blob object replication configuration:
- Blob versioning must be enabled on both source and destination accounts.
- Object replication does not support blob snapshots — existing snapshots in the source blob are not replicated.
- Replication is supported for source and destination accounts in Hot, Cool, or Cold tiers. They may be in different tiers.
- When configuring object replication, you create a replication policy that defines the source and destination storage accounts.
- A replication policy consists of one or more rules that define the source and destination containers, and identify blobs to replicate from the source container.
Uploading Blobs
A blob can contain any data and be of any size. Azure Storage offers three blob types: block blob, page blob, and append blob.
Characteristics of each blob type:
- Block blobs: Composed of blocks of data assembled into a single blob. Most Blob Storage scenarios use block blobs. Ideal for storing text and binary data in the cloud like files, images, and videos.
- Append blobs: Similar to block blobs but optimized for append operations. Suitable for logging scenarios where data continuously grows.
- Page blobs: Can be up to 8 TB in size. Suitable for frequent read/write operations. Used by Azure Virtual Machines for OS and data disks.
Tools
Blob uploads to Azure storage accounts are commonly done using Azure Storage Explorer. However, many other tools are available. Here are some upload options with descriptions:
| Upload Tool | Description |
|---|---|
| AzCopy | A command-line tool that is easy to use on Windows and Linux. Can be used to copy data to and from Blob Storage, between containers, or between storage accounts. |
| Azure Data Box Disk | A service for transferring on-premises data to Blob Storage, suitable for large data or limited network. You can request an SSD from Microsoft, copy your data to the disk, then send it back to Microsoft to upload it to Blob Storage. |
| Azure Import/Export | A service that helps export large amounts of data from your storage account to a hard drive you provide, and Microsoft will return it to you along with your data. |
Business Scenario
Here’s an example of how to upload blob data:
- Select the file to upload.
- Choose blob type and block size.
- Specify the container folder.
- Set access tier and encryption scope.
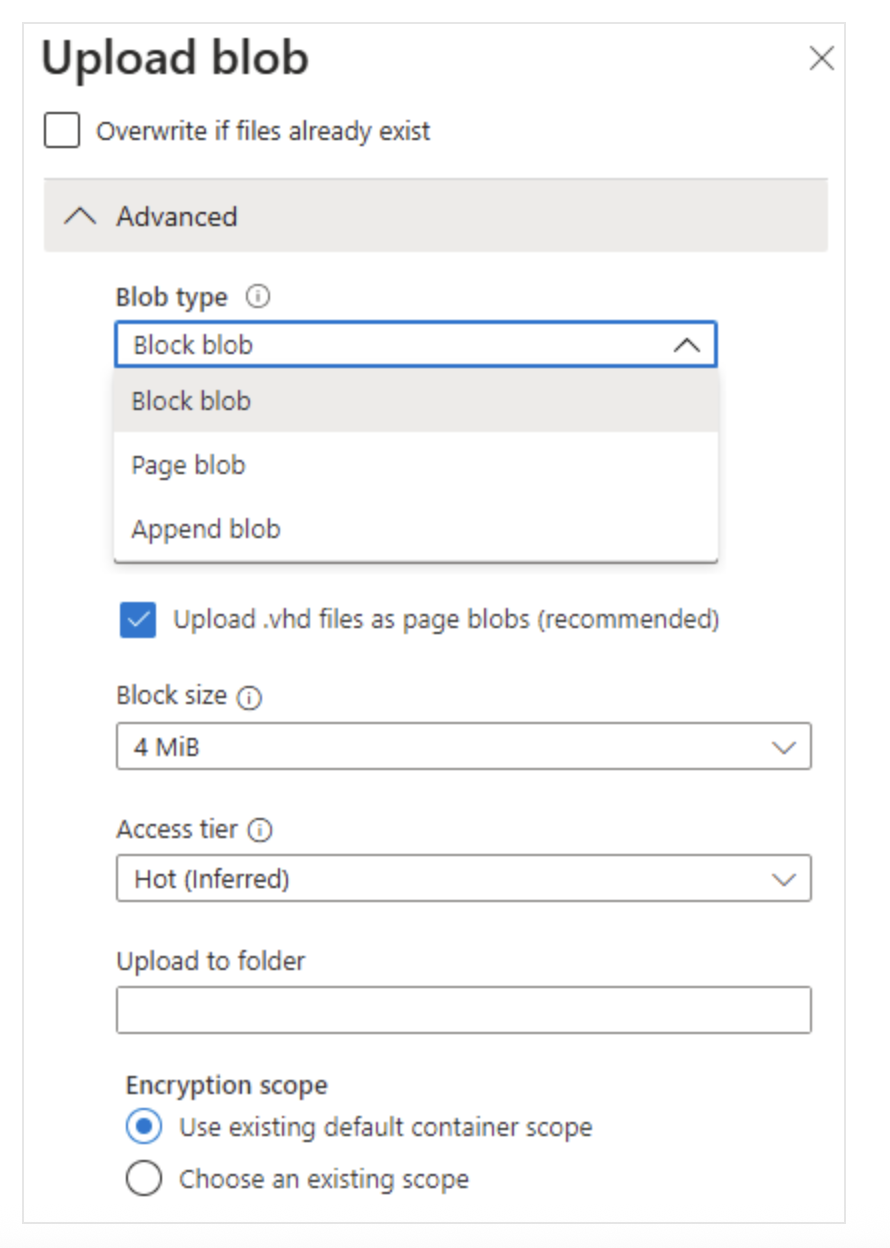
- The default blob type is block blob. If you don’t specify a type when creating the blob, it will default to block blob.
- Once a blob is created, its type cannot be changed.
Understanding Blob Storage Pricing
All Azure storage accounts use the tier-based Azure Blob Storage pricing model. Total block blob storage cost depends on:
- Amount of data stored per month
- Number and type of operations performed, including data transfer costs
- Chosen data redundancy option
Key Concepts in Blob Storage Pricing
Here are some important aspects to understand regarding billing in Azure storage accounts and Blob Storage:
Performance Tier
- The Blob Storage tier determines the amount of data stored and the storage cost.
- The colder the tier, the lower the cost per gigabyte.
Data Access Cost
- Access costs increase with colder tiers.
- In the Cool and Archive tiers, you are charged per gigabyte when reading data.
Transaction Cost
- All tiers incur a per-transaction fee.
- These costs also increase with colder tiers.
Geo-Replication Data Transfer Cost
- Applies to accounts with geo-replication like GRS and RA-GRS.
- Cross-region data transfers are charged per gigabyte.
Outbound Data Transfer Cost
- Outbound data transfers incur bandwidth charges per gigabyte.
- This is consistent with general Azure storage accounts.
Storage Tier Change Cost
- Cool → Hot: Charged equivalent to reading all data in the account.
- Hot → Cool: Charged equivalent to writing all data to the Cool tier.
(Applies to GPv2 accounts only)
Understand your data usage patterns to choose the most cost-effective storage tier and configuration.