Azure App Services Planning Configuration
Implementing Azure App Service Planning
In Azure App Service, an application runs within an Azure App Service Plan. An App Service Plan defines a set of compute resources for running web applications. These compute resources are similar to a server farm in traditional web hosting. One or more apps can be configured to run on the same compute resources (or within the same App Service Plan).
Key Points About App Service Plan
When creating an App Service Plan in a region, a set of compute resources is created for that plan in the specified region. Any application placed into the plan will run on the compute resources defined by that plan.
Each App Service Plan defines the following settings:
- Operating System: Linux or Windows.
- Region: The region for the App Service Plan, such as West US, Central India, North Europe, etc.
- Pricing Tier: Determines the App Service features you get and how much you pay for the plan. The available tiers depend on the selected operating system.
- Number of VM Instances: Currently ranges from three to 30.
- Size of VM Instances: Defined by CPU, memory, and remote storage.
Users can continue to add new apps to an existing plan as long as the plan has sufficient resources to handle the increased load.
Considerations When Using App Service Plan
Review the following considerations regarding the use of Azure App Service Plans for running and scaling apps. Think about conditions that might apply for running and scaling a hotel website.
Consider Cost Savings
Since you pay for the compute resources allocated by the App Service Plan, you can save costs by placing multiple apps into the same App Service Plan.
Consider Multiple Apps in One Plan
Create one plan to support multiple apps for easier configuration and maintenance of shared virtual machine instances. Since apps share the same virtual machines, you need to carefully manage the resources and capacity of the plan.
Consider Plan Capacity
Before adding a new app to an existing plan, determine the resource requirements for the new app and identify the remaining capacity within the plan.
Overloading an App Service Plan can cause downtime for both new and existing apps.
Consider App Isolation
Isolate apps into a new App Service Plan if:
- The app requires a large amount of resources.
- You want to scale the app independently from others in the same plan.
- The app requires resources in a different geographic region.
Setting Pricing for Azure App Service Planning
The Azure App Service Plan pricing tier determines the App Service features you get and how much you pay for the plan. Examples of pricing tiers: Free, Shared, Basic, Standard, Premium, PremiumV2, PremiumV3, Isolated, and IsolatedV2.
How Apps Run and Scale
Azure App Service Plan is the scaling unit for App Service applications. How an app runs and scales depends on the pricing tier:
- If a plan is configured with 5 VM instances, all apps run on all five instances.
- If the plan uses autoscaling, then all apps scale together based on autoscale settings.
Pricing Tier Categories
1. Shared Compute
- Tiers: Free, Shared
- Apps run on Azure VMs shared with other customers' apps.
- CPU is allocated per app; cannot scale out.
- For development and testing only.
- No SLA.
2. Dedicated Compute
- Tiers: Basic, Standard, Premium, PremiumV2, PremiumV3
- Apps run on dedicated Azure VMs.
- Only apps in the same plan share resources.
- Scalable based on the number of VM instances.
3. Isolated
- Tiers: Isolated, IsolatedV2
- Apps run on dedicated Azure VMs within a dedicated virtual network.
- Provides network isolation and maximum performance.
- Can scale up to 100+ instances.
Sample Plan Comparison
| Feature | Free F1 | Basic B1 | Standard S1 | Premium P1V3 |
|---|---|---|---|---|
| Use Case | Dev & Test | Dev & Test | Production | High-scale & performance |
| Staging Slot | N/A | N/A | 5 | 20 |
| Autoscale | N/A | Manual | Rules | Rules, Elastic |
| Scale Instances | N/A | 3 | 10 | 30 |
| Daily Backup | N/A | N/A | 10 | 50 |
Tier Summary
Free and Shared
- Used for development and testing.
- Shares VM with other customer apps.
- No SLA and no scalability.
Basic
- For apps with low traffic needs.
- No advanced autoscaling.
- Supports Web App for Containers (Linux).
Standard
- For running production workloads.
- Supports autoscale and Web App for Containers (Linux).
- Built-in load balancing.
Premium & PremiumV2/V3
- Higher performance for production apps.
- PremiumV2 uses Dv2-series VMs (faster CPU, SSD, high RAM).
- Supports greater scale and advanced features.
Isolated & IsolatedV2
- For mission-critical workloads in private environments.
- Runs in App Service Environment with full network isolation.
- Can scale to over 100 instances.
Choosing an App Service Plan
- Open the Azure portal and search for App Service plans.
- Create a new App Service plan.
- Select Explore pricing plans to view all available plans.
- Choose based on hardware (CPU, memory, instances) and features (backup, staging slot, zone redundancy).
When choosing a service plan, consider both hardware needs and features.
Scale Up and Scale Out in Azure App Service Planning
Two Scaling Methods in Azure App Service
Azure App Service supports two scaling methods:
- Scale Up: Increase CPU, memory, and disk space.
- Scale Out: Increase the number of virtual machines (VMs) running the app.
Scaling can be done manually or automatically (autoscale).
Scaling Explained
1. Scale Up
- Increases CPU, memory, and disk space.
- Adds features such as:
- Dedicated VMs
- Custom domains and certificates
- Staging slots
- Autoscaling
- Performed by changing the pricing tier of the App Service Plan.
2. Scale Out
- Increases the number of VMs running the app.
- Up to 30 VMs depending on the pricing tier.
- Using App Service Environment (Isolated tier) allows up to 100 instances.
- Can be done:
- Manually
- Automatically (Autoscale) with specific rules and schedules.
You can scale up or down anytime just by changing the App Service Plan pricing tier.
Considerations When Scaling
Consider Manual Adjustment
- Start with a low tier (e.g., Free) and increase as needs grow.
- Downgrade tiers when certain features are no longer required to save costs.
Example Scenario:
- Start with Free for early testing.
- Upgrade to Shared to support custom domain names.
- Upgrade to Basic for SSL requirements.
- Upgrade to Standard for staging environment needs.
- Increase VM size in the same tier as needed.
Consider Autoscale
- Maintain app performance during high traffic.
- Autoscale allows instances to increase or decrease automatically based on rules and conditions.
- Saves costs during low traffic by automatically reducing resources.
No Redeploy Needed
- Scaling configuration changes do not require code changes or redeployment.
- Scaling changes take only seconds and apply to all apps within the App Service Plan.
Scale for Other Azure Services
- If the app uses other Azure services like:
- Azure SQL Database
- Azure Storage
- You can scale those services separately, since App Service Plans do not manage them directly.
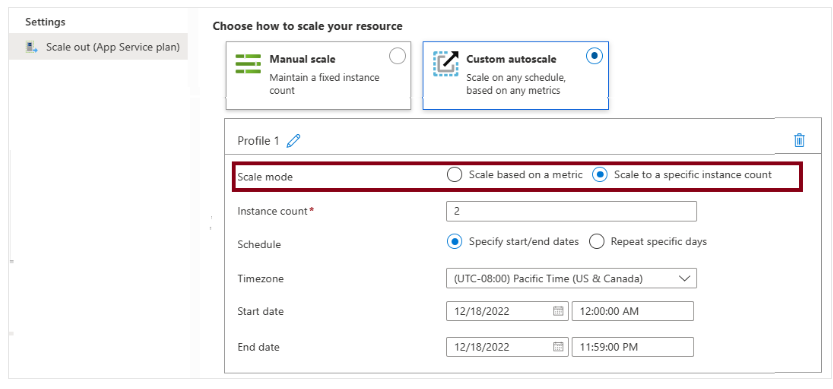
Configuring Autoscale in Azure App Service
Autoscale allows users to adjust the number of resources (VM instances) running based on the application's load:
- Increase instances when load rises.
- Decrease instances when load is low to save costs.
How Autoscale Works
- Users define the minimum and maximum number of instances.
- Based on rules and conditions, autoscale will automatically adjust the number of running instances.
- Autoscale settings are grouped into profiles.
- Autoscale works based on rules that include:
- Triggers
- Scaling actions (scale in or out)
Types of Autoscale Triggers
-
Metric-Based
- Triggers scaling when a certain metric exceeds a threshold.
- Example metrics:
- CPU usage
- Average response time
- Request count
-
Schedule-Based
- Triggers scaling based on time patterns.
- Example:
- Add instances every Saturday at 8:00 AM in a specific time zone.
Autoscale Notifications
- Users can configure notifications to be sent via:
- Webhook
- Notifications are sent when autoscale conditions are met.
Considerations When Setting Up Autoscale
-
Minimum Instance Count
Ensure the app always runs, even under low load. -
Maximum Instance Count
Cap the maximum hourly cost. -
Sufficient Scaling Margin
Ensure the min and max values are distinct and sufficiently spaced. -
Combined Scaling Rules
Always create both scale out and scale in rules to keep apps stable and cost-efficient. -
Appropriate Metric Statistics
Choose relevant metric statistics: Average, Minimum, Maximum, or Total. -
Default Instance Count
Set a safe default value when metrics are unavailable. -
Enable Autoscale Notifications
Monitor app performance during load changes.
Without proper configuration, autoscale can result in poor app performance or excessive costs.