GitLab Components and Workflows
A GitFlow is a set of instructions or guidelines that prescribe how to utilize Git effectively and efficiently in order to achieve work in a consistent and productive way. GitLab Flow creates a seamless approach to software development by integrating a Git workflow with an issue tracking system.
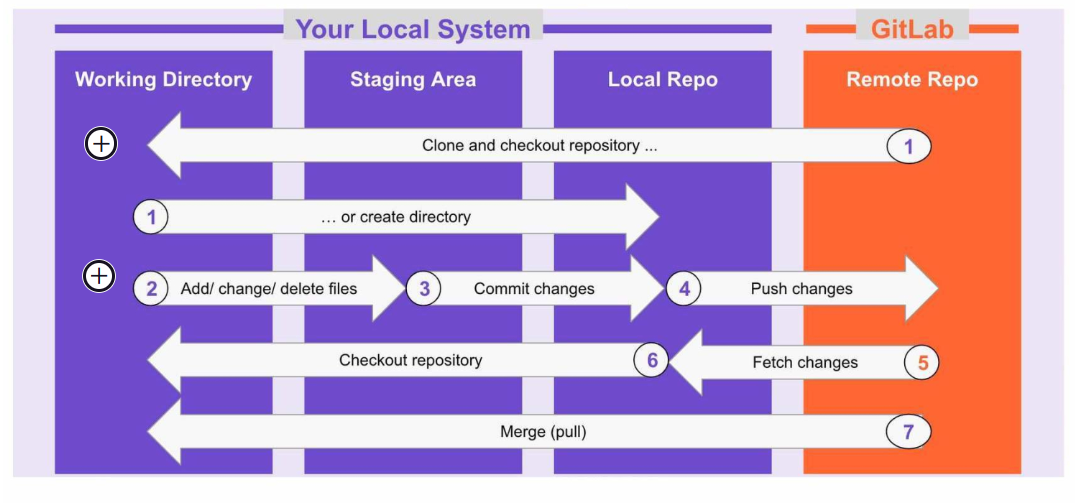
Basic Git Workflow with GitLab
GitLab is based on Git and provides your team with a central repository. You use git locally on your own system to create and update code, share your changes with your team, and see your team’s changes by using git commands to push, fetch, and merge work.
The GitLab Flow: A Simpler Workflow
Organizations use one or more version control systems to develop a productive workflow; however, version control with Git is preferred over alternatives. A GitFlow is a set of instructions or guidelines that prescribe how to utilize Git effectively and efficiently in order to achieve work in a consistent and productive way. GitLab makes it even easier with GitLab Flow.
Git simplifies branching and merging, leading software development teams to move away from other source control tools, like SVN, and adopt a workflow to simplify development.
GitLab Flow creates a seamless approach to software development by integrating a Git workflow with an issue tracking system.
With GitLab Flow, all features and fixes go to the main branch while enabling production and stable branches. GitLab Flow includes a set of best practices and guidelines to ensure software development teams follow a smooth process to ship features collaboratively.
The diagrams below represent the evolution of the Git Flow and where GitLab fits in:
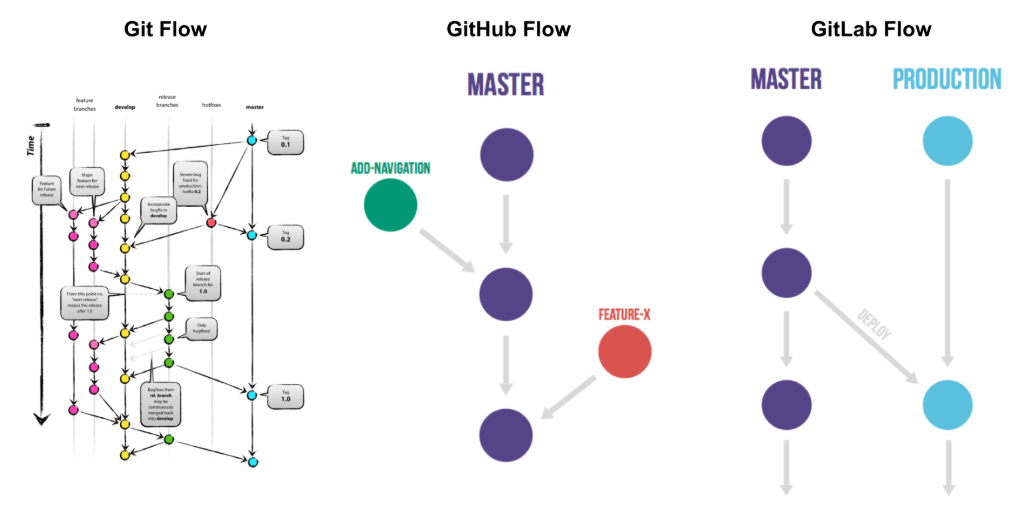
| Git Flow | GitHub Flow | GitLab Flow |
|---|---|---|
| The Git Flow is a feature branch based workflow. Think of the Git Flow diagram as a set of patterns that guide how you organize your branches and think about how to integrate your code into your stable mainline code. It proposes a structured way of organizing branches with a handful of long-lived branches. A feature branch can be created off of Master, work completed there, and then merged back into Master. | GitHub introduced a simpler flow that enables the creation of feature-specific branches that are then merged into a master branch. However, this doesn’t address that many organizations have multiple environments, releases, and integrations. It simplifies the merge workflow by bringing the Master branch back into the equation to absorb lightweight branches. The principles align with Continuous Delivery—getting user stories and features out early so they can be tested before shipping. | GitLab Flow is yet a further refinement of Git Flow and GitHub Flow. We create additional branches to our feature branches that are ephemeral and lightweight. They are integrated and then destroyed. It solves the challenge by integrating the Git workflow with an issue tracking system and the ability to create dedicated branches for environments and releases. |
The GitLab Flow: Environment branches
Branches are versions of a project’s working tree. When you create a new project, GitLab creates a default branch (which cannot be deleted) for your repository. Default branch settings can be configured at the project, subgroup, group, or instance level (GitLab components that will be further described in this course). As your project grows, your team creates more branches. Each branch represents a set of changes, which allows development work to be done in parallel. Development work in one branch does not affect another branch.
Let's build off the previous GitLab flow diagram and see what happens when you introduce feature or environment branches.
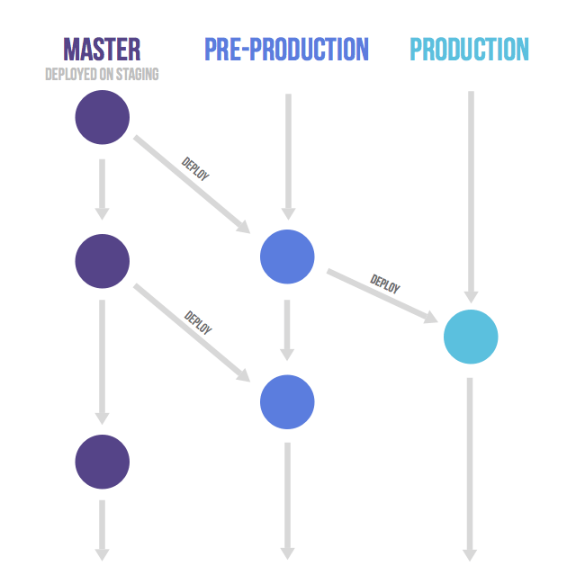
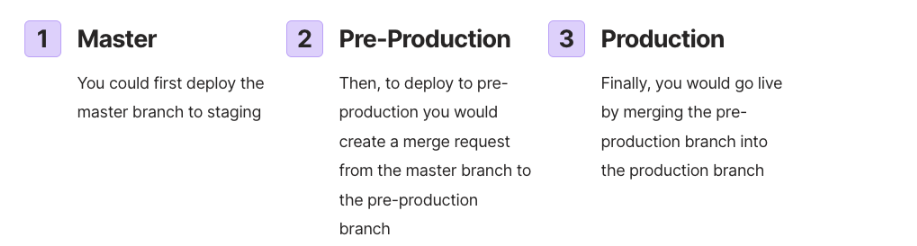
This GitLab flow example has environment branches, such as production and pre-production, or release branches, depending on the needed situation. This workflow also allows for versioned releases and continuous delivery.
This diagram shows the master branch, which might be deployed to a staging environment. In this staging environment, there may be a footprint that approximates production, where we can create additional testing, and this allows us to visualize and take more risks associated with deploying to a production environment.
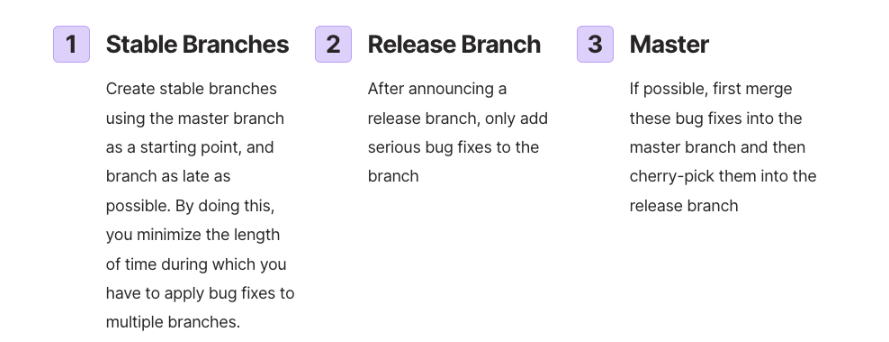
Based on the setup of these environment branches, the recommended workflow would be:
This workflow, where commits only flow downstream, ensures that everything is tested in all environments.
If you need to cherry-pick a commit with a hotfix, it is common to develop it on a feature branch and merge it into the master with a merge request. In this case, do not delete the feature branch yet. If the master passes automatic testing, you then merge the feature branch into the other branches. If this is not possible because more manual testing is required, you can send merge requests from the feature branch to the downstream branches.
The GitLab Flow: Release branches
Release Branches in GitLab
Let's take a look at an example of the GitLab flow using release branches. As a general rule, you should work with release branches only
if you need to release software to the outside world. In this case, each branch contains a minor version, such as 2.3-stable or 2.4-stable:
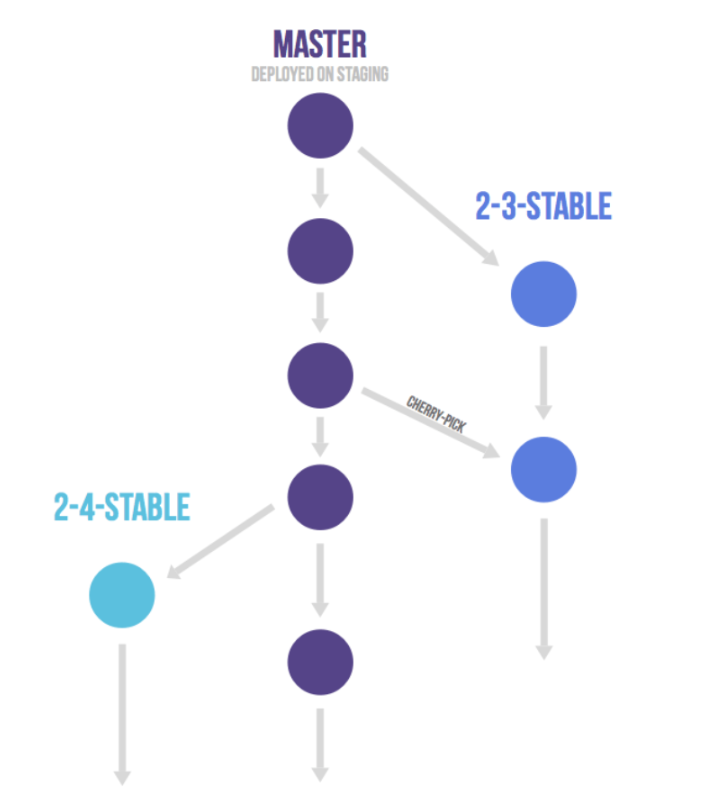
If you start by merging into the release branch, you might forget to cherry-pick them into the master branch and then you’d encounter the same bug in subsequent releases.
Merging into the master branch and then cherry-picking into release is called an “upstream first” policy. Every time you include a bug fix in a release branch, increase the patch version by setting a new tag.
Some projects also have a stable branch that points to the same commit as the latest released branch. In this flow, it is not common to have a production branch.
Branching Tips and Tricks
The GitLab flow lets you incorporate these differently-named environment branches that are automatically updated to the master branch. Branches are the foundation of development in a project.
Branching tips & tricks
- The default branch (named Master if no custom name is set) cannot be deleted
- The default branch is initially protected against forced pushes
- You can manage your branches:
- With the GitLab user interface
- With the command line
- With the Branches API
GitLab branching benefits
- Be able to maintain multiple environments
- Staging environment separate from the production environment
- Provides isolation between environments allowing developers to maintain multiple versions of software in different environments
While other Git flows assume you can deploy to production every time you merge a feature branch, this is possible in some cases, such as SaaS applications, but there are some cases where this is not possible, such as:
- You don’t control the timing of a release. For example, an iOS application that is released when it passes App Store validation.
- You have deployment windows - for example, workdays from 10 AM to 4 PM when the operations team is at full capacity - but you also merge code at other times.
In these cases, you can create a production branch that reflects the deployed code. You can deploy a new version by merging master into the production branch. If you need to know what code is in production, you can check out the production branch to see.
Gitlab Workflow Components
We've taken a look at the GitLab flow and the recommended process to bring an application to production. Let's now take a look at the GitLab workflow components that you will be utilizing.
GitLab uses the below terminology for its components that may be a bit different from other systems you may have used. Here is a table showing each of the main GitLab components and what their functionality is known as in other systems you may have previously used.
| GITLAB COMPONENT | FUNCTION | ALSO KNOWN AS… |
|---|---|---|
| Project | The core building block where work is organized, managed, tracked and delivered to help the team to collaborate and plan work in the form of issues. | Repository |
| Group | A collection of projects and/or other groups. They are like folders. | Project |
| Issue | An issue is part of a project. It is the fundamental planning object where the team documents the use case, discusses the approach, estimates effort, etc. | Story, Narrative, Ticket |
| Epic | A collection of related issues across different groups and projects to help organize by theme. | Initiatives, Themes |
| Merge Request | The linkage between the issue and the actual code changes. Captures design, implementation details, discussions, approvals, testing, and security scans. | Pull Request |
| Label | Used to tag and track work for a project or group and associate issues with different initiatives. | Tag |
| Board | A visual listing of projects and issues useful for teams to manage their backlog of work, prioritize items, and move issues to a stage in the project. | Kanban |
| Milestone | A sprint or deliverable(s), helping you organize code, issues, and merge requests into a cohesive group. | Release |
| Roadmap | A visual representation of the various epics for the group. |
The GitLab Flow: A Deeper Look
Now that we've walked through the GitLab flow and defined the workflow components, let's take a look at the GitLab stages that will enable your development journey.
There are many steps to get from an idea to a solution deployed to production. This graphic shows a more detailed view of the GitLab Flow process. This process can apply to anything - a bug, a feature, a security vulnerability. Throughout this course we will cover each of the steps in this process as we move through the Concurrent DevOps lifecycle and let you get hands-on with each step.
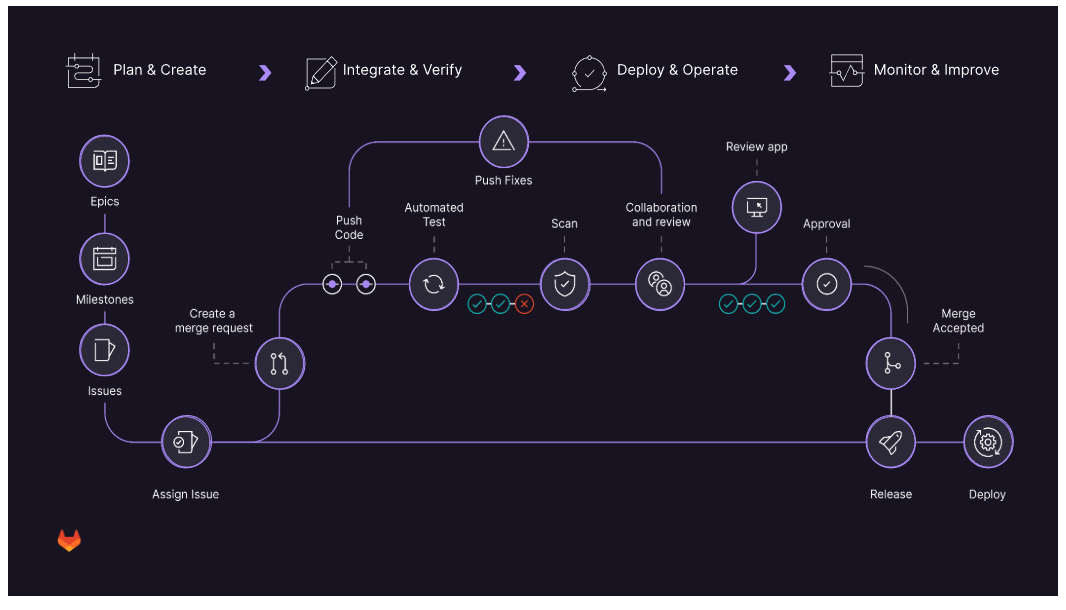
Step 1 - Create an Issue
All changes within GitLab start with an Issue.
Issues can allow you, your team, and your collaborators to share and discuss proposals before, and during, their implementation. However, they can be used for a variety of other purposes, customized to your needs and workflow.
Issues are always associated with a specific project, but if you have multiple projects in a group, you can also view all the issues collectively at the group level.
Common use cases include:
- Discussing the implementation of a new idea
- Tracking tasks and work status
- Accepting feature proposals, questions, support requests, or bug reports
- Elaborating on new code implementations
Step 2 - Create a Merge Request
Once you have created an Issue and added your changes and/or additions, you will Create a Merge Request to start the CI/CD Process.
Merge requests allow you to visualize and collaborate on the proposed changes to source code that exist as commits on a given Git branch.
You may hear a merge request referred to as a pull request.
Step 3 - Commit your changes
Once your Merge Request has been submitted, you will Commit your changes, which will initiate the CI pipeline.
This step will repeat and recycle as the review process starts and as changes are needed.
Step 4 - CI Pipeline runs
During this step, the CI pipeline will run and initiate code builds, run automated tests, and deploy the branch to the staging environment.
If there are errors, conflicts, or other issues, the pipeline will fail and will provide the appropriate error message for the failure for you to research the issue.
Step 5 - Review Apps
Review apps provide an automatic live preview of changes made in a feature branch by spinning up a dynamic environment for your merge requests.
They allow designers and product managers to see your changes without needing to check out your branch and run your changes in a sandbox environment.
Step 6 - Peer Review and Discussion
In this step, you will have peers or stakeholders review your changes in the review app and ensure there are no conflicts or edits that need to be made before your commits are finalized.
Step 7 - Approve changes
Once the peer/stakeholder review is complete, a person with Merge rights/permissions will need to approve your changes.
Step 8 - Merge; Issue Closed; CD Pipeline runs
Once your merge request is approved, the proposed changes are merged into the Master and your issue is closed.
The Continuous Delivery(CD) pipeline will deploy the changes to the production environment and your changes will be live in the system.
Step 9 - Monitor
During this step, you monitor your apps to ensure the changes are having the desired effect.
Keep in mind- with GitLab, it is easy to roll back a change if there is an issue or if anything surfaces in production that needs further adjusting.
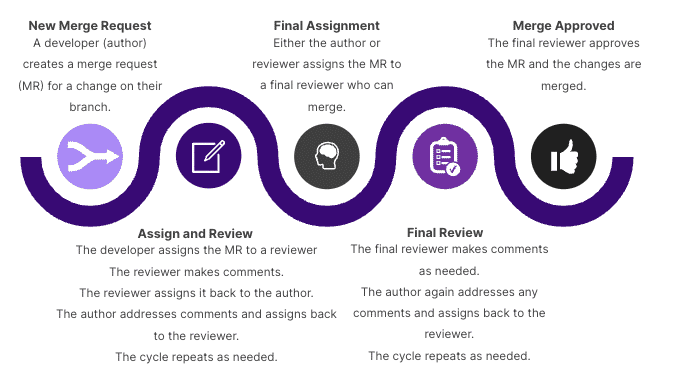
Code Review - Typical Workflow
In order to ensure all code that goes into production is of the highest quality, GitLab has a rigorous review process. Regardless of the size or type of change, every change is reviewed using the flow below.
Additional Tools Used for Code Review & Collaboration
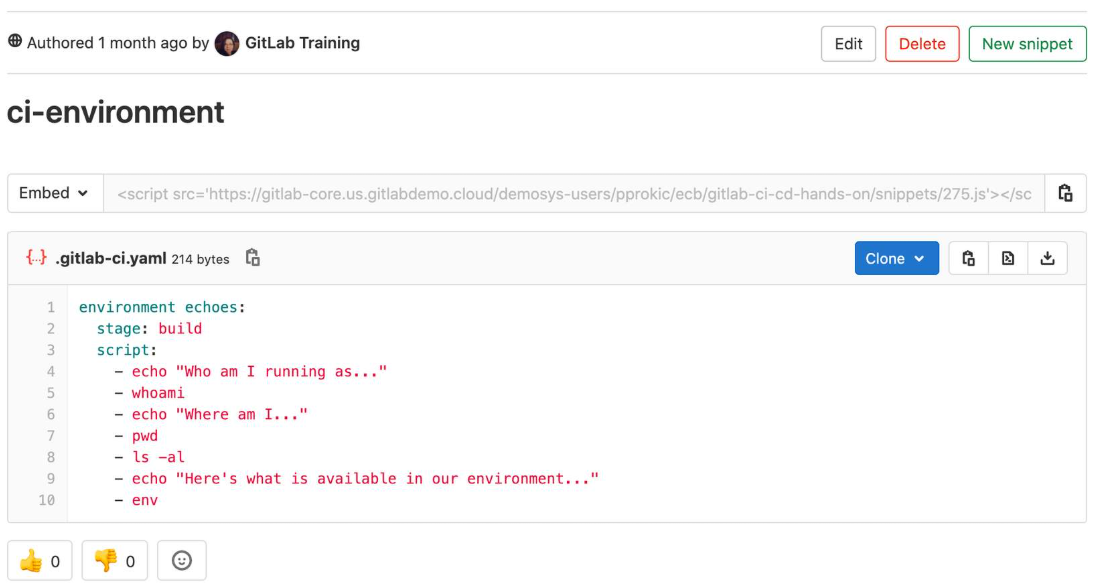
Snippets
With GitLab Snippets you can store and share bits of code and text with other users.
Wikis
A separate system for documentation called Wiki, is built right into each GitLab project. It is enabled by default on all new projects and you can find it under Wiki in your project.
Wikis are very convenient if you don’t want to keep your documentation in your repository, but you do want to keep it in the same project where your code resides.
You can create Wiki pages in the web interface or locally using Git since every Wiki is a separate Git repository.
Web IDE
The Web IDE editor makes it faster and easier to contribute changes to your projects by providing an advanced editor with commit staging. The Web IDE allows making changes on multiple files directly from GitLab interface, n this way it's easy for anyone and everyone to contribute, regardless of their development experience.
The new Web IDE is more user-friendly and efficient, combining VS Code's powerful core features with significantly improved performance and the ability to securely connect to a remote development environment directly from the Web IDE.
This short blog post explains the improvements that the newest version of GitLab's Web IDE brings.